Microgreens are one of the easiest, fastest, and most satisfying things you can grow at home. In as little as 7 to 14 days, you can go from a handful of seeds to a tray of bright, nutrient-packed greens ready for salads, sandwiches, soups, and smoothies. They take very little space, almost no fancy equipment, and they’re a great way to get fresh produce when your garden is frozen, your balcony is tiny, or you just want something green on the counter that actually does something useful.
What makes microgreens so appealing is that they sit in the sweet spot between gardening and cooking. They’re not a long game like tomatoes or peppers, and they’re much more useful than a decorative houseplant. You plant them, watch them explode into growth, and then eat them before you get bored. That quick turnaround is what makes them perfect for beginners, apartment dwellers, winter growers, and anyone who wants fresher food without a major time commitment.
What Are Microgreens?
Microgreens are young vegetable, herb, or herb-like plants harvested after the first true leaves appear, usually when they’re only a few inches tall. They’re older than sprouts but younger than baby greens. That means they’ve moved beyond the seed stage and into the early growth stage, which gives them their signature flavor, color, and nutrition.
They are usually harvested when:
- The cotyledons are open.
- The first true leaves have started to appear.
- The stems are still tender and bright.
That harvest window is what gives microgreens their intense taste. Depending on the crop, they may taste peppery, sweet, nutty, grassy, mustardy, or citrusy. The texture is tender but not mushy, and the visual appeal is part of the fun. A tray of radish microgreens, for example, can look like a tiny green lawn with pink stems and sharp flavor.
Why Grow Microgreens Indoors
Growing microgreens indoors solves a lot of the problems that make fresh eating harder than it should be. You don’t need a yard. You don’t need warm weather. You don’t need pollinators, raised beds, or a lot of patience. You just need a little light, a tray, a growing medium, and seeds.
There are a few big reasons people love indoor microgreens:
- They grow fast.
- They don’t need much space.
- They work well year-round.
- They’re inexpensive once you get set up.
- They can be harvested in a single week or two.
- They make healthy eating feel immediate and achievable.
That last point matters more than people think. A lot of healthy habits fail because the payoff is too slow. Microgreens are the opposite. They give you visible progress almost immediately.
What You Need to Get Started With Growing Microgreens indoors
The basic setup is simple. You don’t need a hydroponic system or a fancy grow tent to start.
Here’s the basic list:
- Seeds.
- Two shallow trays, or one tray with drainage and one solid tray underneath.
- A growing medium such as seed-starting mix, coco coir, or hemp mat.
- Water.
- A light source, ideally a sunny window or a grow light.
- A spray bottle or watering method that won’t blast the seedlings over.
If you want to keep it simple, buy a standard seed-starting tray and a bag of fine seed mix. If you want the cleanest setup, use a shallow tray with a mat and bottom watering. If you want the easiest setup, use a kit, but you can absolutely do this cheaply with household supplies.
The Best Microgreen Seeds for Beginners
Not all microgreens grow equally well. Some are forgiving, fast, and flavorful. Others are slower or more finicky. If this is your first run, start with crops that germinate quickly and don’t demand perfect conditions.
Good beginner microgreens include:
- Radish.
- Broccoli.
- Sunflower.
- Pea shoots.
- Mustard.
- Arugula.
- Buckwheat.
- Cress.
Radish is one of the easiest and fastest choices. It sprouts aggressively, grows fast, and gives a sharp, peppery result. Broccoli is milder and very popular for people who want a subtle flavor. Sunflower shoots are more substantial and taste nutty and fresh. Pea shoots are tender, sweet, and great in salads or stir-fries.
If you’re chasing variety, you can try blends, but single varieties are often better for learning because you can see how each crop behaves.
How to Prepare the Tray
Before planting, make sure your tray is clean. Microgreens grow fast, but so can mold if your setup is sloppy. Wash trays well, especially if you’re reusing them.
Then:
- Fill the tray with about 1 to 1.5 inches of growing medium.
- Moisten the medium evenly, but don’t make it soggy.
- Level the surface lightly.
- Scatter seeds densely across the top.
Microgreens are planted much more densely than normal garden plants. You’re not trying to give each seed lots of space. You’re creating a carpet of seedlings that will be cut as one harvest. If you sow too lightly, the tray may be sparse and less productive. If you sow too heavily, airflow can suffer. Like most things in indoor gardening, density takes a little practice.
How Much Seed to Use
Seed amount depends on the crop and tray size. The goal is an even layer, not a seed pile. Some seeds are tiny and spread easily; others are larger and more obvious.
General planting idea:
- Tiny seeds: light but full coverage.
- Medium seeds: dense, even scattering.
- Large seeds: slightly less dense, but still close together.
The most important thing is avoiding bare patches. You want seedlings to support each other as they grow. At the same time, don’t overdo it so much that the tray becomes a wet, compacted mat of stems.
Watering the Right Way
This is where many beginners go wrong. Microgreens need moisture, but not swamp conditions. Too much water encourages mold and damping-off, while too little stops germination and causes weak growth.
The best approach is usually:
- Moisten the medium before sowing.
- Mist lightly or bottom-water after sowing.
- Keep the surface consistently damp, not soaked.
- Water gently once roots begin to form.
Bottom watering is often better than pouring water over the top because it keeps the stems drier and lowers the risk of mold. If you’re using a tray under the growing tray, pour water into the bottom tray and let the medium wick it up.
If the top of the medium starts looking dry, that doesn’t always mean the root zone is dry. Check below the surface before adding more water. Microgreens like even moisture more than dramatic swings between dry and flooded.
Why Light Is The Secret to Strong Microgreen Growth
After germination, light becomes one of the most important factors in growing good microgreens. Without enough light, they get leggy, pale, and weak. With good light, they stay compact, colorful, and full of flavor.
You have a few options:
- Bright windowsill.
- Full-spectrum grow light.
- A combination of natural and artificial light.
A sunny south-facing window may be enough in some homes, but winter or cloudy weather often reduces quality. Grow lights make the result much more predictable. Place the light close enough to prevent stretching, but not so close that it heats or scorches the seedlings.
Microgreens usually do well with 12 to 16 hours of light after germination, depending on the crop and the strength of the light. The more consistent the light, the more uniform the tray.
The Microgreens Germination Phase
Most microgreens germinate best when they’re covered or lightly weighted for the first few days. This helps the seeds stay in contact with moisture and encourages even sprouting.
A common approach:
- Sow seeds.
- Mist gently.
- Cover the tray with another tray or a lid.
- Optionally add light weight on top for the first couple of days.
- Check daily for sprouting.
During this stage, seeds are using stored energy to push roots down and shoots up. The tray should stay moist and dark or dim until most seeds have sprouted. Once the seedlings start lifting the cover, they’re ready for light.
This stage is one reason microgreens feel so fast. The first visible change comes quickly, and after that the tray seems to transform almost daily.
The Growth Phase
Once the seedlings are uncovered and moved into light, growth accelerates. You’ll see the stems lengthen, leaves open, and color intensify. The tray becomes a miniature crop in its own right.
At this stage:
- Keep the moisture even.
- Give plenty of light.
- Watch for mold or fuzzy growth.
- Improve airflow if the tray seems too damp.
- Rotate the tray if one side leans toward the light.
Good airflow matters. Stagnant, overly humid conditions can create problems fast, especially with dense sowings. A small fan nearby on low can help. You don’t want windblown seedlings; you just want moving air.
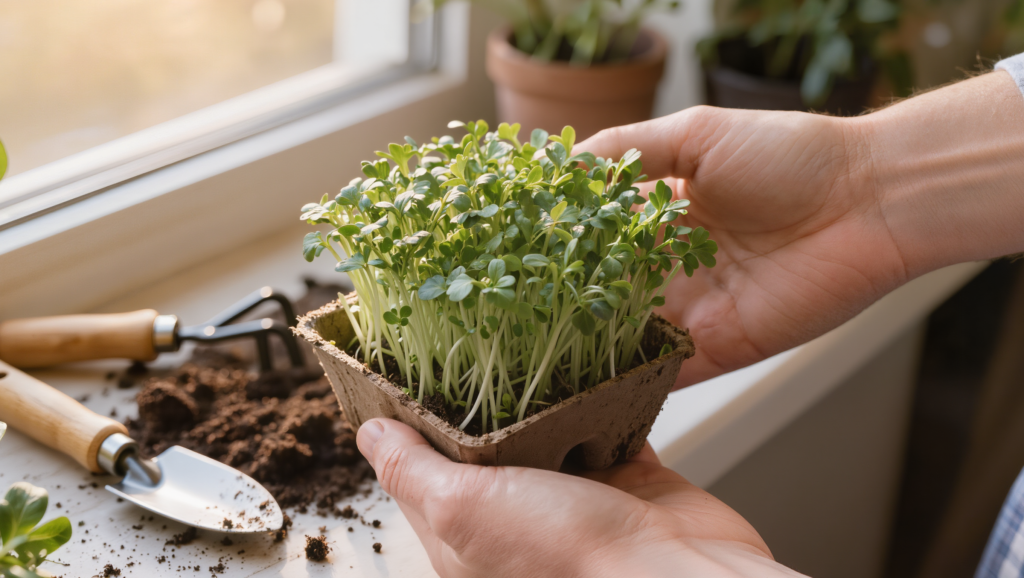
When to Harvest Your Microgreens
Most microgreens are ready when they are 2 to 4 inches tall and have developed at least one set of true leaves, depending on the crop. The exact timing depends on the seed type, light, and temperature. Radish may be ready very quickly. Pea shoots and sunflower shoots usually take a little longer.
Harvest by cutting just above the soil line with clean scissors or a knife. Try to harvest when the plants are dry, not wet. That helps reduce spoilage during storage.
If you want maximum freshness, harvest only what you’ll use within a few days. If you’re growing for a household, stagger your planting so you have a new tray starting while another tray is being eaten.
How to Store Microgreens After Harvesting
Microgreens are best right after harvest, but they can be stored for short periods if you handle them gently.
Storage tips:
- Pat them dry if necessary.
- Put them in a breathable container or loosely sealed bag.
- Keep them in the refrigerator.
- Avoid crushing them under heavy items.
Because they’re delicate, microgreens lose texture faster than mature greens. That’s part of the tradeoff for growing them at home. They’re meant to be fresh, crisp, and close to the moment of harvest.
How to Use Microgreens in Real Food
Microgreens are not just for garnish. They can transform ordinary food into something that feels fresher and more intentional.
Good uses include:
- Salads.
- Sandwiches.
- Wraps.
- Grain bowls.
- Omelets.
- Soups added at the end.
- Smoothies.
- Avocado toast.
- Rice or noodle bowls.
A handful of microgreens adds color, texture, and sharpness. Radish microgreens can wake up a bland sandwich. Pea shoots can make a salad feel more substantial. Broccoli microgreens work well when you want mild flavor and easy volume.
If you grow your own, you’ll probably use more of them because they’re right there. That’s the beauty of home growing: convenience can work in your favor when the food is already alive and ready.
Nutrition and Why They’re Worth It
Microgreens are often praised for being nutrient-dense, and while the exact nutrition depends on the crop, many varieties are rich in vitamins, minerals, and plant compounds. Because they’re harvested young, they can contain concentrated levels of certain nutrients relative to their size.
That doesn’t mean they’re a miracle food. They’re not replacing your entire diet. But they are a very efficient way to increase the nutrient quality of meals with little effort. If you add microgreens to foods you already eat, you’re stacking health value onto normal meals rather than trying to reinvent your entire kitchen.
Common Mistakes to Avoid in Indoor Microgreens Gardening
A few things tend to trip up beginners:
- Overwatering.
- Under-lighting.
- Sowing too thinly or too densely.
- Using dirty trays.
- Forgetting airflow.
- Waiting too long to harvest.
- Thinking every crop behaves the same way.
The good news is that microgreens are forgiving. If one tray fails, you learn fast and try again immediately. The next tray will probably be better.
A Simple 10-Day Microgreen Routine
If you want a straightforward plan, here’s a rough version:
Day 1: Fill tray, moisten medium, sow seeds, cover.
Day 2–3: Keep dark/covered and moist.
Day 4: Check for sprouting, uncover, move to light.
Day 5–8: Keep evenly watered and well-lit.
Day 9–10: Harvest if ready, or wait a little longer depending on crop.
Some crops will be faster, some slower. The point is that the whole process is short enough to stay exciting.
Why This Is One of the Best Indoor Growing Projects
Microgreens are the ideal “small win” project. They fit into a tiny apartment, a winter kitchen, a busy life, or a beginner’s skill level. They give fast feedback, real food, and a genuine sense of momentum. You don’t need a perfect setup to succeed. You just need to start.
If you’ve been wanting to grow something edible indoors, microgreens are probably the best place to begin. They’re fast, cheap, forgiving, and useful. And when you can go from seed to salad in about 10 days, it’s hard not to feel a little impressed by your own kitchen.