Dreaming of adding a touch of golden luxury to your dishes? Saffron, the world’s most expensive spice, might seem like an exotic enigma, but what if I told you it’s entirely possible to cultivate this crimson treasure right in your own garden? That’s right! Growing your own saffron ( Crocus sativus) can be a surprisingly rewarding and even cost-effective endeavor. Forget those tiny, exorbitant supermarket jars – imagine harvesting vibrant, fragrant threads fresh from your own backyard!
In this comprehensive, step-by-step guide, we’ll demystify the art of saffron cultivation, from choosing the right bulbs to harvesting those precious stigmas. We’ll delve into the science, share expert tips, and sprinkle in some fascinating facts along the way. So, roll up your sleeves, grab a cup of tea (perhaps infused with a touch of saffron if you’re already ahead of the game!), and let’s embark on this golden journey together.
Why Grow Your Own Saffron? Beyond the Price Tag
Okay, let’s address the elephant in the room: cost. At upwards of 20 per gram, saffron’s price tag is legendary. This steep cost is primarily due to the incredibly labor-intensive harvesting process – each tiny stigma must be hand-picked from individual flowers. A single gram can contain anywhere from 150 to 300 delicate threads! So, yes, saving money is a huge motivator.
But the benefits extend far beyond your wallet. Growing your own saffron offers:
- Unrivaled Freshness & Flavor: Store-bought saffron, while lovely, can’t compete with the vibrant aroma and potent flavor of freshly harvested threads.
- A Unique Gardening Experience: Cultivating saffron is a conversation starter and a genuinely unique addition to any garden.
- Purity & Control: You control the entire growing process, ensuring your saffron is organic and free from any additives or contaminants.
- The Joy of Self-Sufficiency: There’s immense satisfaction in knowing you’ve produced such a prized ingredient yourself.
- Beautiful Blooms: Before those precious threads emerge, you’ll be treated to a stunning display of delicate purple flowers in the autumn.
Ready to dive in? Let’s get our hands dirty!
Step 1: Sourcing Your Saffron Crocus Corms (Not Bulbs!)
First things first: saffron comes from corms, not true bulbs. While often used interchangeably in casual conversation, botanically, they’re distinct. Corms are swollen underground stems that store food, whereas bulbs have fleshy scales.
Where to Buy:
- Specialty Nurseries & Online Retailers: This is your best bet. Look for reputable suppliers who specialize in spring- and autumn-flowering bulbs. Examples include Brent and Becky’s Bulbs, Van Engelen, or specific saffron corm suppliers.
- Local Garden Centers: Some larger or more specialized garden centers might carry them, especially in regions with suitable climates.
- Avoid Grocery Store Saffron: The saffron you buy for cooking won’t sprout! You need the actual corms.
Key Considerations When Buying Corms:
- Size Matters: Larger corms (around 9-10 cm or larger in circumference) are more likely to produce flowers in their first year. Smaller corms might take an extra season to mature.
- Health: Ensure corms are firm, free from mold, soft spots, or signs of disease or pests.
- Quantity: A general rule of thumb is to plant around 50-75 corms for a usable yield in your first year. Each flower produces three stigmas, and you’ll need many flowers for even a small amount of spice.
When to Buy & Plant:
Saffron crocuses are autumn-flowering. This means you need to plant their corms in late summer to early autumn, typically August to September, depending on your local climate. This allows them to establish roots before the blooming season.
Step 2: Choosing the Perfect Location & Preparing Your Soil
Saffron crocuses are surprisingly adaptable, but they do have preferences that will significantly impact your success.
Sunlight:
- Full Sun is King: Saffron needs at least 6-8 hours of direct sunlight per day. The more sun, the better the flowering and subsequent saffron production. Choose a spot that isn’t shaded by trees or buildings, especially in the afternoon.
Soil Requirements:
- Well-Draining Soil is Non-Negotiable: This is arguably the most critical factor. Saffron corms are highly susceptible to rot in waterlogged soil. If your soil is heavy clay, you must amend it.
- Improve Drainage: Incorporate plenty of organic matter like compost, well-rotted manure, or peat moss. Adding horticultural grit or sand can also help, but organic matter is superior for long-term soil health.
- Raised Beds or Containers: If your native soil is particularly poor or drainage is a persistent issue, consider planting in raised beds or large containers. This allows you to create an ideal soil mix.
- pH Level: Saffron prefers a slightly acidic to neutral soil pH, ideally between 6.0 and 8.0. Most garden soils fall within this range. If you’re unsure, a simple soil test kit can give you precise readings.
- Nutrient-Rich: While not heavy feeders, well-draining, moderately fertile soil will support robust growth. A balanced slow-release fertilizer can be incorporated at planting, but often, good compost is sufficient.
Site Preparation:
- Clear the Area: Remove any weeds, rocks, or debris from your chosen planting site.
- Loosen the Soil: Dig down about 8-10 inches (20-25 cm) and loosen the soil thoroughly.
- Amend as Needed: Mix in your chosen organic matter and any other amendments to improve drainage and fertility.
- Consider Critters: Squirrels, voles, and other rodents love to snack on crocus corms. If these are an issue in your garden, consider planting in wire cages or using deterrents. Some gardeners plant in hardware cloth-lined beds.
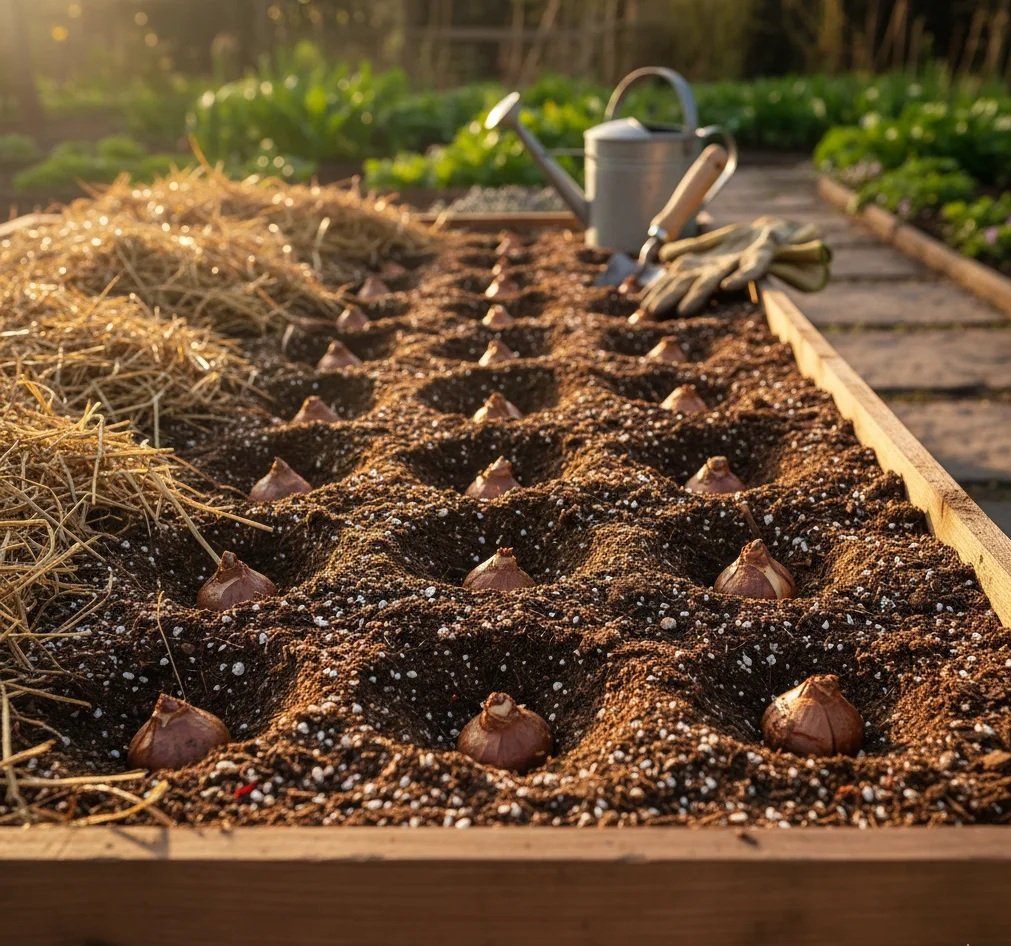
Step 3: Planting Your Saffron Corms – The Nitty-Gritty
Now for the fun part! Getting those corms into the ground.
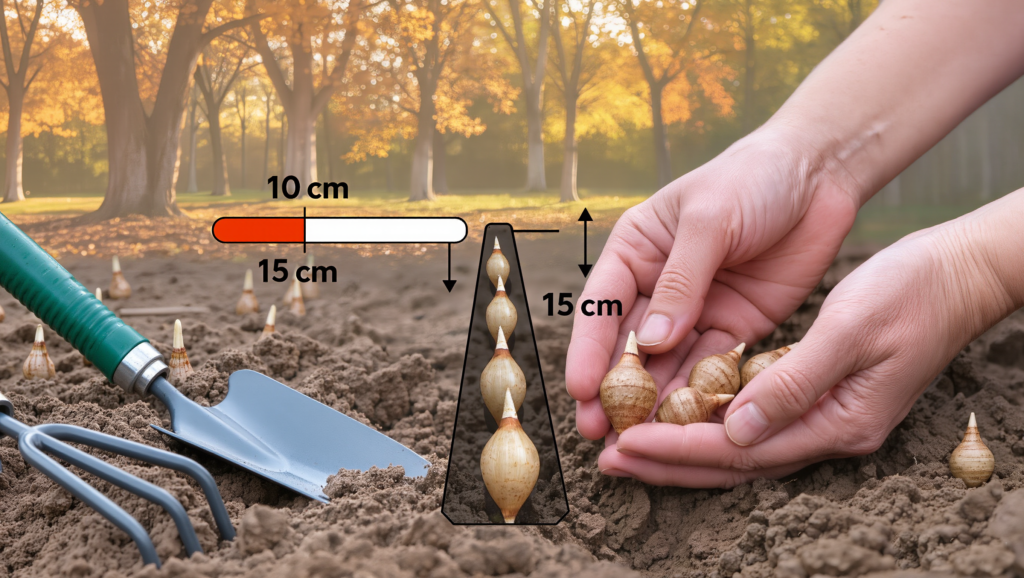
Planting Depth:
- Plant corms about 4-6 inches (10-15 cm) deep, with the pointed side facing upwards. If you can’t tell which side is up, plant them on their side; they’ll figure it out!
- In warmer climates, some recommend planting slightly deeper (up to 8 inches) to help keep the corms cooler.
Spacing:
- Space corms approximately 3-4 inches (7.5-10 cm) apart. While they can tolerate closer spacing, giving them a bit of room ensures good air circulation and allows for future cormlet (daughter corm) development.
- You can plant them in neat rows or more naturalized drifts for a beautiful display.
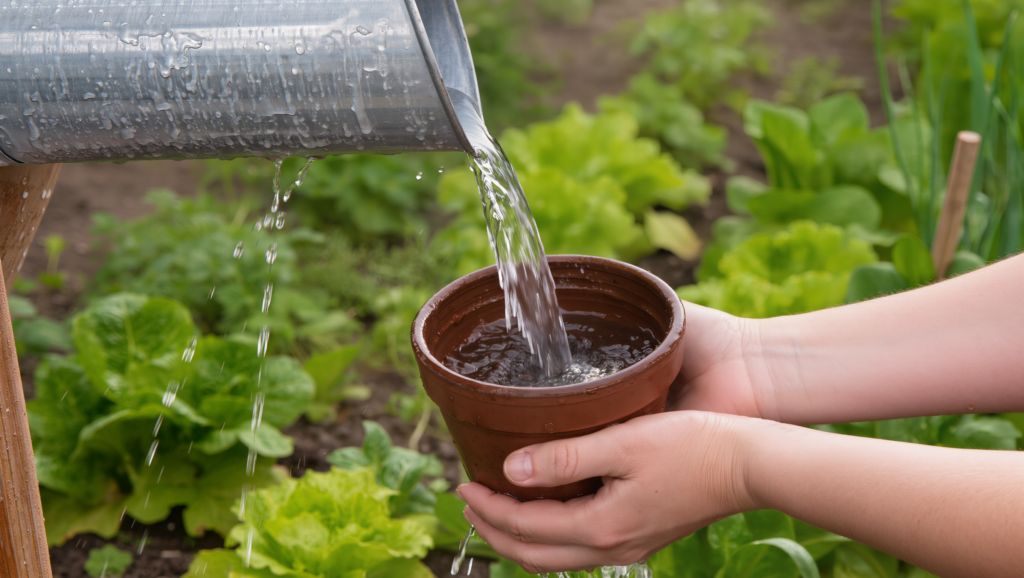
Watering After Planting:
- After planting, water thoroughly. This helps settle the soil around the corms and kickstarts root development. Ensure the soil is moist, but not waterlogged.
Here’s what your newly planted saffron bed might look like.
Step 4: Ongoing Care and Maintenance – Nurturing Your Golden Crop
Once planted, saffron crocuses are relatively low-maintenance, but a little care goes a long way.
Watering:
- During Growth & Flowering (Autumn): Keep the soil consistently moist but never soggy. If you receive regular autumn rainfall, you might not need to water at all. In dry spells, provide supplemental water.
- During Dormancy (Summer): Saffron corms go dormant in summer. At this point, they prefer dry conditions. Avoid watering during summer dormancy to prevent rot. The foliage will die back, signaling this period.
Fertilization:
- If your soil was well-amended with compost at planting, additional fertilizer might not be necessary in the first year.
- In subsequent years, a light application of a balanced, low-nitrogen fertilizer (e.g., 5-10-10) in early autumn, just as growth begins, can be beneficial. Avoid high-nitrogen fertilizers, which promote leafy growth over flowers.
Weeding:
- Keep the area around your saffron crocuses free of weeds. Weeds compete for nutrients and water, and can also hinder air circulation. Hand-weeding is best to avoid disturbing the corms.
Pest and Disease Control:
- Rodents: As mentioned, squirrels, voles, and mice can be problematic. Physical barriers (wire cages) or natural deterrents might be needed.
- Fungal Diseases: The primary concern is corm rot, almost always caused by poor drainage and excessive moisture. Ensure excellent drainage and avoid overwatering.
- Saffron crocuses are generally quite hardy and not prone to many other serious pest or disease issues.
Winter Care (Hardiness Zones):
- Saffron crocuses are hardy in USDA Zones 6-9 (some sources say 5-9).
- In colder zones (5 or below), you might need to provide a layer of mulch (straw, leaves) for winter protection after the foliage dies back.
- In very cold, wet climates, some gardeners choose to lift the corms after the foliage dies back in summer, store them in a cool, dry, dark place over winter, and replant in late summer. This is generally only necessary if your winter conditions are extremely harsh and wet.
Step 5: The Anticipated Bloom – When to Expect Your Golden Threads
This is where the magic happens! Saffron crocuses typically bloom in mid to late autumn, often October or November, depending on your climate.
- You’ll first see slender, grass-like foliage emerging from the soil.
- Soon after, the beautiful, delicate purple flowers will appear, often before the foliage fully develops.
- Each flower will contain three prominent, vibrant red-orange stigmas – these are your precious saffron threads!
Here’s a glimpse of those beautiful blooms just waiting to be harvested.
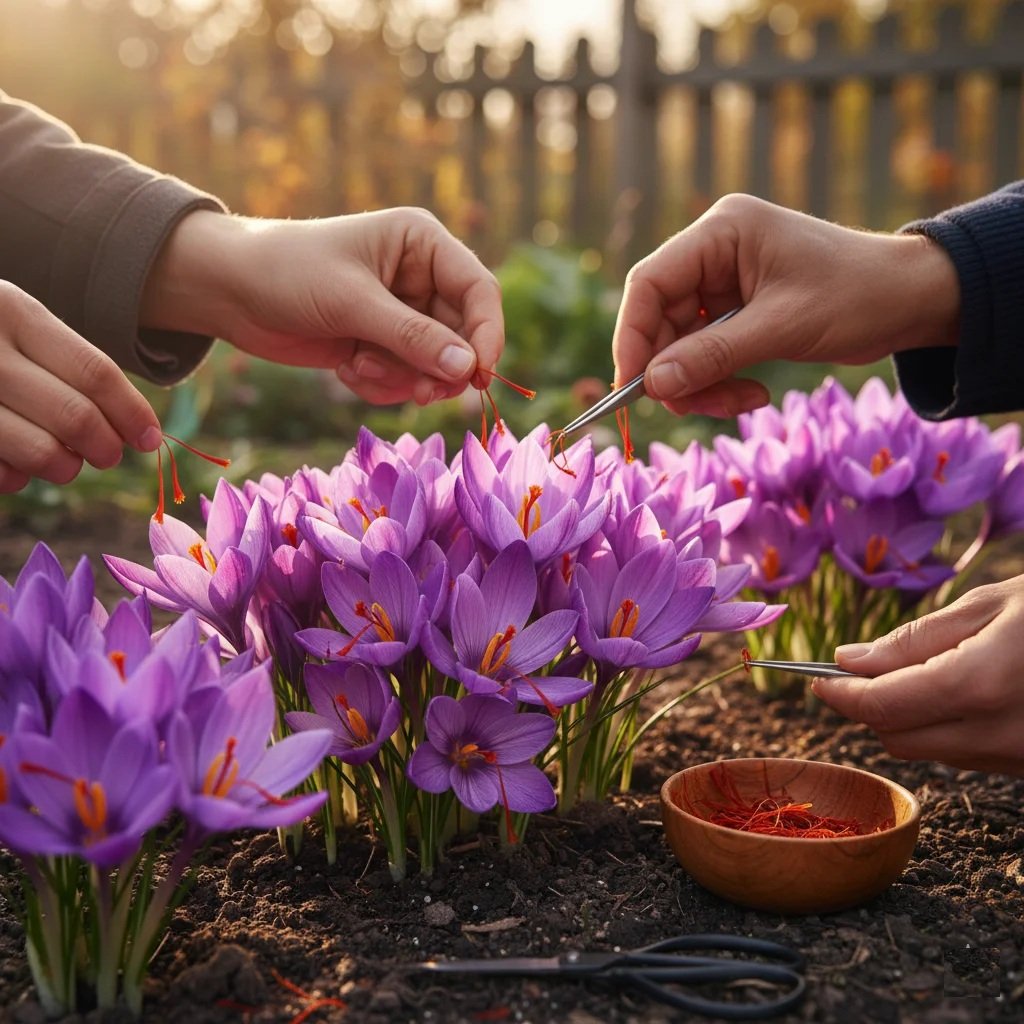
Step 6: Harvesting Your Saffron – The Delicate Art of “Plucking Gold”
This is the most exciting, yet labor-intensive, part of growing saffron. You’ll understand why it’s so expensive!
When to Harvest:
- Harvest the flowers on the day they open. The stigmas are at their peak freshness and potency.
- The best time to harvest is in the early morning after the dew has dried, but before the sun gets too strong, which can cause the flowers to wilt.
How to Harvest:
- Gather Your Tools: You’ll need nimble fingers, or a pair of small, sharp tweezers, and a clean, dry container to hold your harvested stigmas.
- Gently Pick the Flower: Some gardeners gently pluck the entire flower from the plant. Others prefer to leave the flower attached and just remove the stigmas.
- Extract the Stigmas: Carefully open the bloom to expose the three bright red-orange stigmas in the center. Using your fingers or tweezers, gently pluck or snip these three threads, ensuring you get the entire stigma, not just a portion. Avoid picking the yellow stamens; only the red stigmas are saffron.
- Repeat: This process must be repeated daily as new flowers open. The blooming period typically lasts for about 2-3 weeks.
This intricate hand-picking is what makes saffron so valuable. Each flower gives you just a tiny fraction of a gram!
Step 7: Drying Your Saffron – Preserving the Aroma and Flavor
Once harvested, your saffron stigmas need to be properly dried to preserve their color, aroma, and flavor, and to prevent mold. This is a crucial step!
Drying Methods:
- Air Drying (Traditional & Best for Small Batches):
- Spread the fresh stigmas in a single layer on a clean paper towel, fine mesh screen, or a sheet of parchment paper.
- Place them in a warm, dry room with good air circulation, out of direct sunlight.
- Allow them to air dry for several days to a week. They are dry when they feel brittle and snap easily.
- Dehydrator:
- If you have a food dehydrator, set it to the lowest temperature (usually around 90-100°F or 32-38°C).
- Spread the stigmas in a single layer on the trays.
- This method is faster, often taking only a few hours. Check frequently to prevent over-drying.
- Oven (Use with Caution!):
- This is the riskiest method and only recommended if you have no other options.
- Preheat your oven to its absolute lowest setting, ideally just warm (below 150°F or 65°C). Turn the oven off after it reaches temperature.
- Spread stigmas on parchment paper on a baking sheet.
- Place them in the warm oven with the door slightly ajar to allow moisture to escape.
- Check every 15-30 minutes. The residual heat should be enough.
- Do NOT “bake” your saffron at higher temperatures, as this will destroy its delicate flavor and aroma.
How to Tell if Saffron is Dry:
- Feel: The threads should be brittle and snap when bent, not flexible.
- Appearance: They should retain their vibrant red-orange color, perhaps slightly deepened.
- Weight: They will be significantly lighter.
Properly dried saffron can be stored for several years without losing much potency.
Step 8: Storing Your Homegrown Saffron – Keeping It Fresh
Once dried, proper storage is key to maintaining your saffron’s quality.
- Airtight Container: Transfer the dried saffron threads to a small, airtight container. A glass jar with a tight-fitting lid is ideal.
- Dark, Cool Place: Store the container in a cool, dark pantry or cupboard, away from direct sunlight, heat, and humidity.
- Avoid Refrigeration/Freezing: It’s generally not recommended to refrigerate or freeze dried saffron, as moisture and temperature fluctuations can degrade its quality.
Stored correctly, your homegrown saffron can retain its potency and flavor for up to 2-3 years, although it’s best used within the first year for optimal freshness.
Step 9: Enjoying Your Harvest – Culinary Delights Await!
Congratulations! You’ve successfully grown and harvested your own saffron. Now comes the best part: enjoying the fruits (or rather, stigmas!) of your labor.
How to Use Saffron:
Saffron’s intense flavor and aroma require moderation. A little goes a very long way!
- Bloom Before Use: For best results, “bloom” your saffron threads before adding them to dishes. This means steeping them in a small amount of warm liquid (water, milk, broth, or alcohol) for 15-30 minutes. This releases their full color and flavor.
- Classic Dishes:
- Paella: The quintessential saffron dish.
- Risotto Milanese: Creamy, golden, and deeply flavorful.
- Biryani: Aromatic rice dishes common in South Asian cuisine.
- Bouillabaisse: A rich French fish stew.
- Baking: Saffron adds a beautiful golden hue and unique flavor to breads, cakes, and pastries (e.g., Swedish Saffron Buns).
- Desserts: Infuse custards, ice creams, or even simple syrups with saffron for an elegant touch.
- Teas & Beverages: A few strands can be steeped to make a soothing, aromatic tea.
Remember, the goal is to enhance, not overpower. Start with just a few threads and adjust to your taste.
Further Insights & Tips for Saffron Success
- Corm Multiplication: Saffron corms are perennial. Each mother corm will produce several “cormlets” or daughter corms over time. This means your saffron patch will naturally expand over the years, giving you more flowers and more saffron! You can gently divide these corms every 3-5 years to thin out the patch and ensure healthy growth.
- Foliage Care: After flowering, the grass-like foliage will continue to grow through winter and spring. Do not cut this foliage back! It’s essential for the corms to photosynthesize and store energy for the following year’s blooms. Allow it to die back naturally in late spring/early summer.
- Patience is a Virtue: While some larger corms might flower in their first year, smaller corms or less-than-ideal conditions might mean you wait until the second year for a significant harvest. Don’t be discouraged!
- Source Credibility: Always choose reputable suppliers for your corms. Quality corms are the foundation of a successful saffron garden. Reputable sources like those listed by horticultural extension services can be a good starting point. [Example: University of Massachusetts Amherst Extension, though not specific to saffron, often lists general guidelines for sourcing bulbs/corms. It’s always good to check local university extensions for region-specific advice.]
The Science Behind the Spice: Crocin, Picrocrocin, and Safranal
The magic of saffron lies in its complex chemistry. The key compounds responsible for its distinct characteristics are:
- Crocin: This carotenoid pigment is responsible for saffron’s intense red color and, when used in cooking, the beautiful golden hue it imparts to food. Crocin is also a powerful antioxidant. [Source: “Saffron (Crocus sativus L.): A Comprehensive Review of Its Phytochemistry, Health Benefits, and Applications.” Journal of Ethnopharmacology, 2018.]
- Picrocrocin: This is the glycoside responsible for saffron’s characteristic bitter taste. During the drying and curing process, picrocrocin breaks down to form safranal.
- Safranal: This volatile compound is the primary component responsible for saffron’s unique and highly prized aroma. [Source: “Major Components of the Aroma and Taste of Saffron.” Food Chemistry, 2007.]
These compounds, particularly safranal, are quite delicate. This is why proper drying and storage are so critical to preserving the quality of your homegrown saffron.
Conclusion: Your Golden Opportunity Awaits!
Growing your own saffron is more than just a gardening project; it’s an immersive experience that connects you to an ancient culinary tradition and one of the world’s most luxurious spices. From the delicate purple blooms that grace your autumn garden to the vibrant, aromatic threads that elevate your cooking, every step is a testament to nature’s bounty and your dedication.
So, if you’re ready to embrace the challenge and reap the golden rewards, grab those corms, prepare your soil, and get ready to sprinkle a little homegrown luxury into your life. Happy saffron growing!